Downloading The Operating System:
There are a number of operating systems that you can install on your Raspberry Pi, if you are a beginner, then do not consider anything except one of the Linux distributions, and if you are an advanced user, then you probably won't be reading this anyway.
The most popular and Stable Operating system is "Wheezy-Raspbian" It is the Raspberry Pi recommended distribution, best for those that want the 'default standard' - nearly every Pi out there runs Raspbian.
You can download The Wheezy-Raspbian Image file from Here.
The most popular and Stable Operating system is "Wheezy-Raspbian" It is the Raspberry Pi recommended distribution, best for those that want the 'default standard' - nearly every Pi out there runs Raspbian.
You can download The Wheezy-Raspbian Image file from Here.
Setting Up Operating System for Raspberry Pi (From now onwards I will call it "Raspi" :D ):
When you buy a RasPi, it may or may not be sold with an SD card. The SD card is important because this is where the Raspberry Pi keeps its operating system and is also where you will store your documents and programs.
If your Pi did not come with an SD card then the minimum size you should get is 4GB, but buy a bigger SD card if you think you will need the space.
If your Pi did not come with an SD card then the minimum size you should get is 4GB, but buy a bigger SD card if you think you will need the space.
What You will Need to Write an Image on SD Card:

- A 'regular' computer with a built-in SD card reader, or an add-on USB SD card reader.If you are having MicroSD card adapter, to insert the smaller card into it, that also works good!
- Format your SD card using the SD Card Association’s formatting tool.
- Win 32 Disk Imager (Download)
- RCA or HDMI cable (Must)
- USB Keyboard (Must)
- Old NTSC/PAL Color TV or Projector with RCA Cable connector or HDMI Based LCD Display. (Note that these displays will only required to setting up Raspi for the first time, then the next post will help you to start session on your Windows Based Computer)
- A good quality, micro USB power supply that can provide at least 700mA at 5V to our Raspi
Ffff.. List is too long right? So these all we need to setup our Raspi. :)
So Lets start the process.
- Insert the SD card in to the Built-in SD card reader or to the USB cable.
- Format the SD card using the SDformatter downloaded from the Link provided in the List.
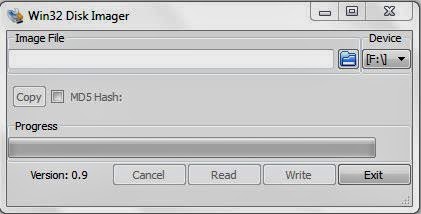
Open Win32 Disk Imager and Locate the "Wheezy-Raspbian Image file" and Write the image file to the SD card by selcting the right device in the Device drop down menu.(Tip: To avoid the mistakes,remove all other removable devices like Pendrives and other memory cards from card reader, only keep SD card in which you want to burn the Image of Raspbian)- After writing the Image successfully,remove the SD card from your computer .
- Now carefully connect the Display Device with the Raspi using RCA/HDMI cable.
- Insert the same SD card in Raspi in which you imported the Image using Win32 Disk Imager just now.
- Connect Power supply (700mA at 5V, Samsung Android Mobile Charger will Work, but before connecting it to the Raspberry Pi, please check the rating at the back of your charger, Charger of High-end devices like Note1 and Further, S2 and Further provides high current ratings upto 2Amps!! Beware of it!! It can spoil your Raspi)
- Switch it on!
- Now you will be able to see the Configuration window on the screen.


- That's all.!! The Operating system is ready to use. Press Enter, which will take you back to the Configuration Window.
- You can set the change_locale, change_timezone and enable the SSH server for sharing the display to the Windows based PC.
- Overscan Option in Configuration window: Being designed to work with TVs, you may find that your Pi is only using the middle portion of the screen and there is a big unused area all round the screen. You can enable it to solve the Problem.
- The options described above are those which could pretty much be considered essential when running your Raspberry Pi for the first time. There are some other options listed that are worth describing briefly.
- configure_keyboard – as it implies allows you to chose from a long list of keyboard layouts.
- change_pass – allows you to change the system password for the user 'pi' the default user on the system. By default, this password is 'raspberry' so those preoccupied with security may wish to change the password.
- change_locale – For non-English speakers, you can select which locales should be available on the system and which should be the default for the operating system.
- memory_split – allows you to adjust how much of the shared system memory is available for graphics and how much for the main processor. If you plan to run graphics hungry games, or video playback, then you may decide to alter these settings.
- ssh – in a later tutorial we will look at remote controlling your Pi from another computer using ssh. This option allows you to enable ssh so that you can do that.
 So now, reboot the Raspberry PI and You will be able to see the screen of the command shell of raspberry pi asking you for Username.
- By Default the User name is : pi
- Password is : raspberry
- After Successful login you will see the command line shell of Raspberry Pi asking you to enter any linux command.
- pi@raspberrypi~$
- type 'startx'
- Now you will be able to see the screen of the Raspberry Pi with UI.
- You can start playing with that now.
ENJOY!!!!!!!
Thank you for Reading, geeks!!
